Brakes & Brake Parts for US Cars: Selection and Installation
US car brakes: what to check before buying. Compare vehicle fitment, kit contents and relevant products.
Basics: Understanding the brake system on a US car
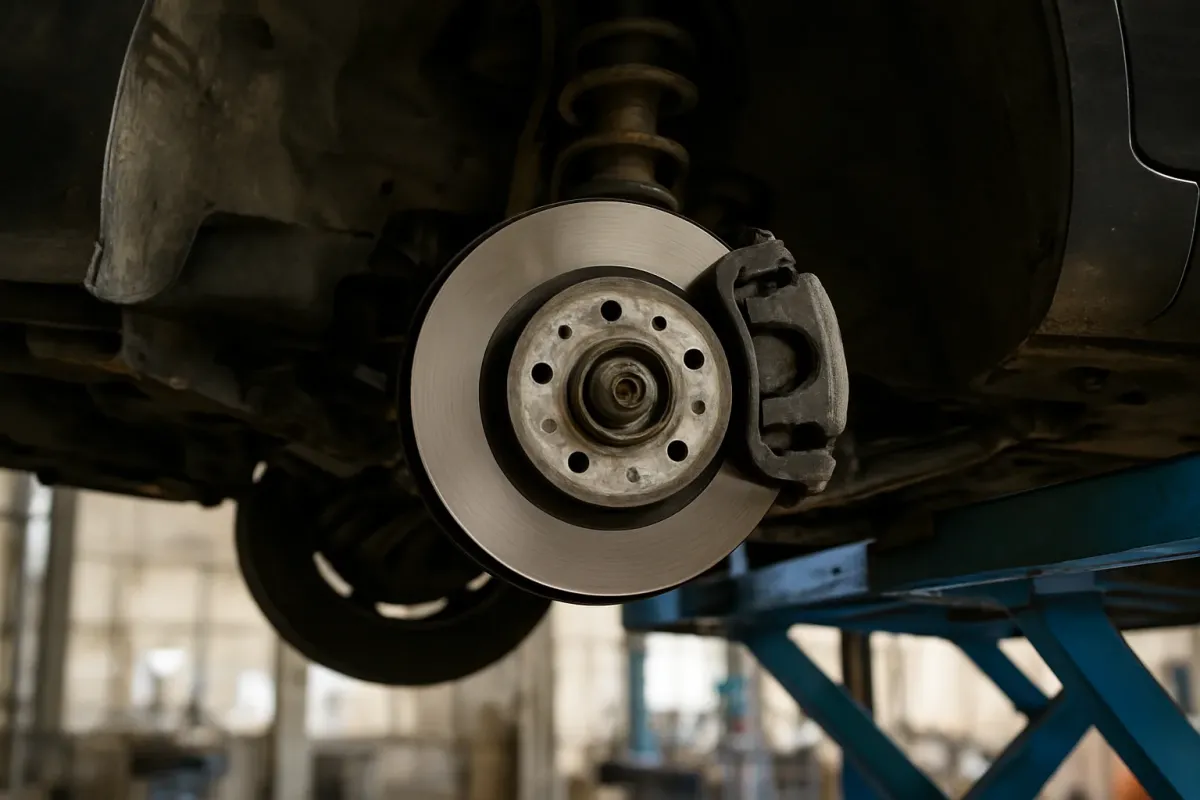
Before you replace brakes or brake parts on your US vehicle, you should be familiar with the basic layout of the system. Most modern US cars have disc brakes at the front, and at the rear either disc or drum brakes depending on year and vehicle class. SUVs and pickups like the Chevrolet Tahoe, GMC Yukon or Dodge Ram often have larger rotors and stronger calipers because they are designed for higher loads.
Typical components you as a home mechanic will replace yourself include:
- Brake rotors (front and rear)
- Brake pads for disc brakes
- Brake shoes on drum brakes or parking brake in a “drum-in-hat” system
- Brake calipers and brackets
- Small parts like guide pins, slide clips, bleeder screws
An overview of suitable components can be found in the category Brakes & Brake Parts.
Choosing suitable brake parts for your US vehicle
Determine vehicle data correctly
US vehicles often have different brake systems within a single model line (e.g. depending on engine, drivetrain, heavy-duty package). Don’t rely only on “year roughly fits”, always check:
- Manufacturer, model, year
- Engine and drive (e.g. AWD/4x4)
- Body variant (pickup, SUV, van)
- VIN (vehicle identification number), if available
- Existing brake system (e.g. Teves, Bosch or similar, if specified)
Examples: For a Dodge Ram 1500 pickup 1994–1999 there are specific front brake pads, see Front brake pads for Dodge Ram 1500 1994–1999. On the Jeep Grand Cherokee 1999–2002 the Teves braking system is indicated separately, see Front brake pads Teves.
Compare construction and dimensions
Even if a part is listed as fitting in the catalog, it’s sensible to compare it with the removed parts:
- Compare the shape and number of cutouts / tabs on the pad carrier
- Check diameter, thickness and hat depth of rotors
- Compare the bolt pattern and hub centering of the rotor with the wheel hub
- Check the position of the bleeder screw and the ports on the caliper
Example: For Chevrolet Tahoe and GMC Yukon there are different variants depending on year and drivetrain. For vehicles from 2007 with rear disc brakes, drilled rotor kits with pads can be used, e.g. drilled rear rotors with pads from 2007, while early years sometimes have different dimensions.
Different pad types and intended use
For rough orientation (always check product description for details):
- Organic pads: generally softer, comfortable, more for normal road use.
- Semi-metallic pads: higher temperature resistance, a good compromise for heavy US SUVs and pickups.
- Ceramic pads: low dust, often quieter, suitable for modern cars and crossovers.
For heavy vehicles like the Hummer H2 or Lincoln MKT/MKS/MKX durable pads for everyday use are important, see e.g. Rear brake pads for Hummer H2 or Rear brake pads for Lincoln MKT/MKS/MKX.
Which brake parts should you replace together?
To avoid follow-up damage and to ensure even braking performance, you should always work axle-wise and as systematically as possible.
- Always in pairs per axle: never replace pads and rotors only on one side.
- Pads and rotors together when:
- the rotor has reached or fallen below the minimum thickness,
- cracks, grooves or heat discoloration are visible,
- the rotor is heavily worn (lip at the edge).
- Brake shoes on drums/parking brake should be renewed if the friction material is cracked, contaminated with oil or very unevenly worn.
- Calipers or brackets should be replaced if pistons seize, threads are damaged or guide pins are heavily corroded.
Suitable brake rotors can be found in the category Brake rotors, pads under Brake pads, complete kits under Complete brake kits.
Preparation: Safety and tools
Work on the brake system requires clean and safe working practices.
Safety aspects
- Park the vehicle on a solid, level surface, engage gear/park, use the parking brake (except on the axle currently being worked on).
- Use sturdy jack stands, not just the jack.
- Wear eye and hand protection, especially when using brake cleaner.
- Never have two people work at the pedal without clear coordination to avoid accidental actuation.
Typical tools
- Socket and combination wrench set in SAE and/or metric (depending on vehicle)
- Torque wrench (lug nuts, caliper mounting)
- Piston retraction tool or C-clamp for calipers
- Wire brush and brake cleaner
- Possibly Torx/Allen for guide bolts
- Catch container and hose for brake fluid when bleeding
Always take the exact torque values and steps from the workshop literature or the service manual for your vehicle. Do not guess.
Installation: Disc brakes on front and rear axle
1. Removal of wheel and old brake parts
- Loosen lug nuts slightly with the vehicle on the ground, raise the vehicle and support on jack stands.
- Remove the wheel completely and set aside.
- Take photos of the brake area to document the position of springs/clips.
- Loosen caliper guide bolts, remove the caliper and hang it from the suspension with wire (do not hang on the hose).
- Remove brake pads and any retaining clips.
- Remove caliper bracket if necessary to remove the rotor.
- Remove any rotor retaining screws (if present) and pull off the rotor. For seized rotors use penetrating oil and a rubber mallet; do not apply force to the wheel bearings.
2. Inspect the components
After removal you should check the following points:
- Condition of rubber boots on guide pins and pistons
- Free movement of guide pins
- Corrosion on the caliper bracket and on the pad contact surfaces
- Surface of the wheel hub (rust-free, flat mounting surface for the new rotor)
Defective guide pins or brackets can usually be replaced via the category Calipers & Brackets. Other small parts can sometimes be found under Other brake parts.
3. Install new rotors
- Clean the wheel hub surface with a wire brush so the rotor seats flat.
- Remove protective oil from the new rotor with brake cleaner (friction face and hat exterior).
- Mount the rotor, secure it lightly if necessary with a retaining screw or a lug nut.
- Install the caliper bracket and torque to the specified values (values from the service manual).
4. Install new brake pads
- Clean the contact surfaces on the bracket, install new slide clips if applicable.
- Lightly coat sliding points with high-temperature brake grease (do not get any on friction surfaces of pads or rotors).
- Retract the caliper piston fully and evenly using a suitable tool. Vehicles with an integrated parking brake in the caliper often require a special retraction tool.
- Install new pads in the correct orientation in the bracket (observe inner/outer position, wear sensor location if applicable).
- Swing the caliper over the new pads, insert the guide bolts and tighten to manufacturer specifications.
5. Final steps
- Check that the brake hose and bleeder screw are free of tension and leak-free.
- Mount the wheel and tighten the lug nuts in a criss-cross pattern to the specified torque.
- At the end of the job, with all four wheels done, press the brake pedal several times with the vehicle stationary until a firm pedal feel is achieved.
Specials: Rear axle, drum brakes and parking brake
Many US SUVs and pickups have a combination of a disc for the service brake and small drum shoes in the disc hat for the parking brake (“drum-in-hat”).
Parking brake shoes
When renewing the rear disc brakes you should check the parking brake:
- Pull the rotor off with the parking brake released.
- Check the brake shoes for lining thickness, cracks and delamination.
- Check return springs and adjusters for free movement.
- After installing the rotor and shoes, adjust the parking brake according to the workshop manual.
For pure drum brakes on the rear axle (e.g. on older models) the procedure is similar, but you work entirely inside the drum. Note that the arrangement of springs and adjusters varies by model – photos during disassembly are particularly helpful here.
Bed-in new pads and avoid mistakes
Properly bed in new parts
After installing new rotors and pads you should bed them in so the friction partners match optimally. Common procedure (always follow the pad manufacturer’s instructions):
- In the first 200–300 km avoid hard stops from high speed where possible.
- Perform several moderate decelerations from moderate speed, allowing the brakes to cool in between.
- Avoid holding the pedal fully down while hot for extended periods (e.g. after mountain descents).
Common installation errors
- Pads fitted incorrectly: pads cant or do not sit cleanly in the carriers → uneven wear, squealing.
- No or wrong lubricant on sliding points → caliper sticks, pads wear unevenly.
- Overstressed or incorrectly torqued lug nuts → warped rotors, brake shudder.
- Piston not fully retracted → dragging brake, overheating.
- Ignoring old brake fluid condition: high water content leads to fading and corrosion in the system. Observe brake fluid change intervals per manufacturer.
When to go to a professional workshop?
Even experienced home mechanics reach limits when working on brakes. You should involve a professional workshop if:
- you don’t have a suitable torque wrench or a lift/jack stands,
- corrosion on load-bearing parts (e.g. steering knuckle, caliper mount) is visible,
- you find leaks in the hydraulic system (lines, hoses, master cylinder),
- you are unsure about correct bleeding (ABS/ESP system).
On modern US vehicles with complex ESP/ABS systems, diagnostic software may be required after component replacement (e.g. to actuate ABS valves or to reset electronic parking brakes). Whether this is necessary for your model is stated in the vehicle-specific service documentation.
Frequently asked questions
How can I tell if my rotors need replacing?
Signs are noticeable vibrations in the steering wheel when braking, deep grooves in the rotor surface, visible heat cracks or a clearly felt lip at the rotor edge. A reliable assessment comes from measuring rotor thickness and comparing it with the minimum thickness specified in the service manual.
Can I use different pads front and rear?
Yes, different pad compounds can be used front and rear; this is normal for many production vehicles. However, within one axle you must always fit matching pads. If you change compound (e.g. to a very sporty material) you should test the braking behavior and consult specialists if in doubt.
Do I have to replace brake fluid after every brake job?
No, not necessarily after every pad or rotor change. Brake fluid change intervals are defined in the vehicle maintenance schedule (often every 2 years, but this can vary). If air is introduced into the system during work or a hydraulic component is replaced, bleeding and, if necessary, topping up with fresh brake fluid is required.